Do you dream of transforming your bustling living room into an oasis of serenity? Join me on a journey as I showcase my latest interior design project – a breathtaking transformation from chaos to tranquillity.
This client used the Ultimate package which includes the essential package + deluxe package + upgrade to
- consultation zoom call or local meet up
- colour palette
- 20 sourced and linked mood board products
- 2D + 3D design with rendered colour visual
- three revisions included
- furniture and accesory placement
- One month post design support
- Up to 3 weeks Design timescale
Find out more here about the packages available!
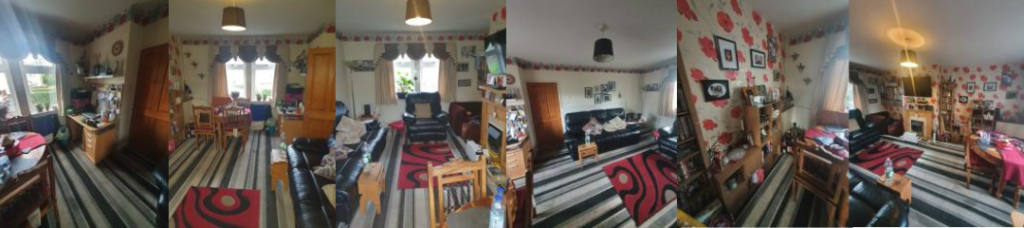
Step 1: The Before
Before the makeover, this room was a sensory overload. Striped carpets clashed with floral walls, dark furnishings, and dominating shades of red and black. The client’s brief was to take this muddled room and make sure it calm. The home belongs to a family and the lounge is used as an office, dining room, gaming room for children with virtual reality sets and relaxation in the evening.
As you can see from the images below, this was a very exciting project!
Ensure your before identifies all the things you want to change and what you want to keep. This is vital as your first step in the transformation process.
Step 2: A Serene Palette
Now you know what you want to change, it’s colour time. I selected a soothing colour palette centred around a purchased grey sofa. Soft pinks, purples, yellows, and blues were introduced to create a calm and balanced atmosphere.
The sofa was purchased during the design process so the revisions included in the Ultimate package worked perfectly for the client. I swapped in the grey corner sofa to the design and gave a selection of colour palettes to continue the interior design into a 3D render and mood board.
Step 3: Optimizing Space
Following the colour palette decision, I created a 2D layout to optimize space. This involved creating dedicated areas for relaxation, virtual gaming, dining, and a hidden desk – catering to the whole family’s needs.
Seating was in the command position with a balanced arrangement of the dining area and hideaway desk. I ensured there was still space for gaming for the children and pathways were clear to promote a smooth flow of energy (chi) through the space.
I always consider the bag map when arranging a room and this was no different. Enhancing life by placement of furniture can positively impact wealth, health and relationships. I am here as your Feng Shui expert for personalised guidance tailored to your home.
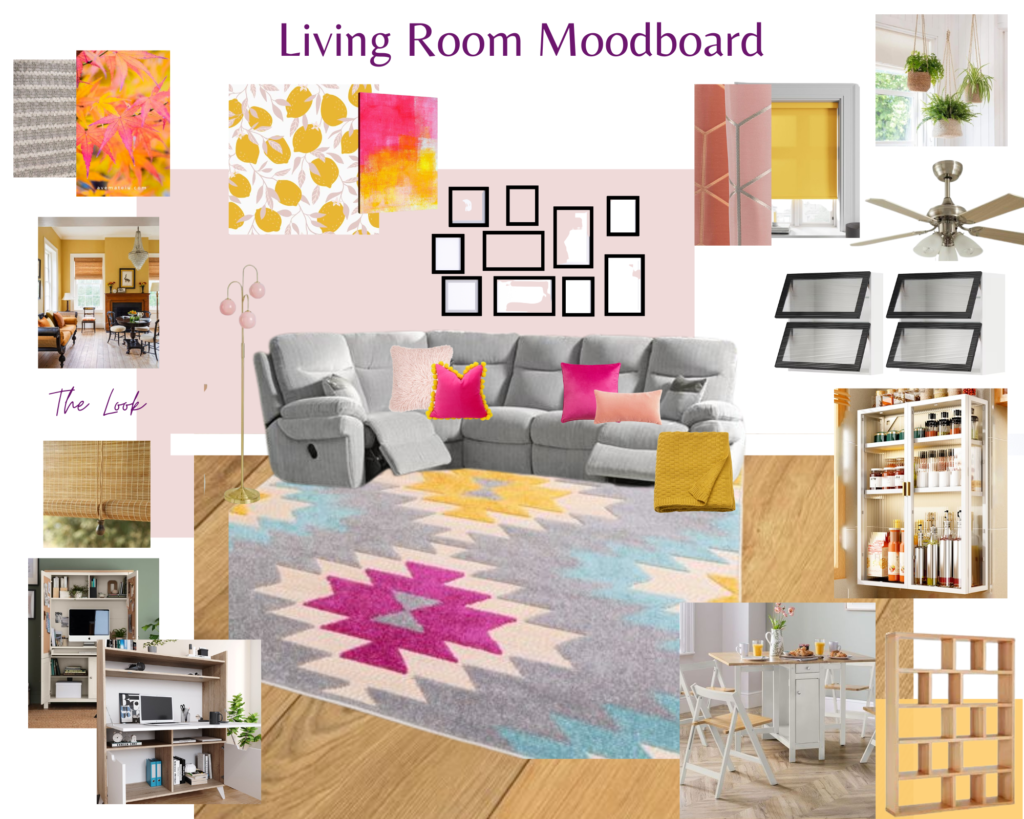
Step 4: The Vision
In addition to colour and layout, vision is needed! A bespoke mood board came alive with Japan-inspired shelving and clever wall storage solutions. A fan and light for warmer months now we have those heat waves in the UK and vibrant artwork! In this project I featured bold nature patterns in vibrant colours to compliment the overall theme. The bamboo accessories added an organic touch and consideration to materials and textures within the living room
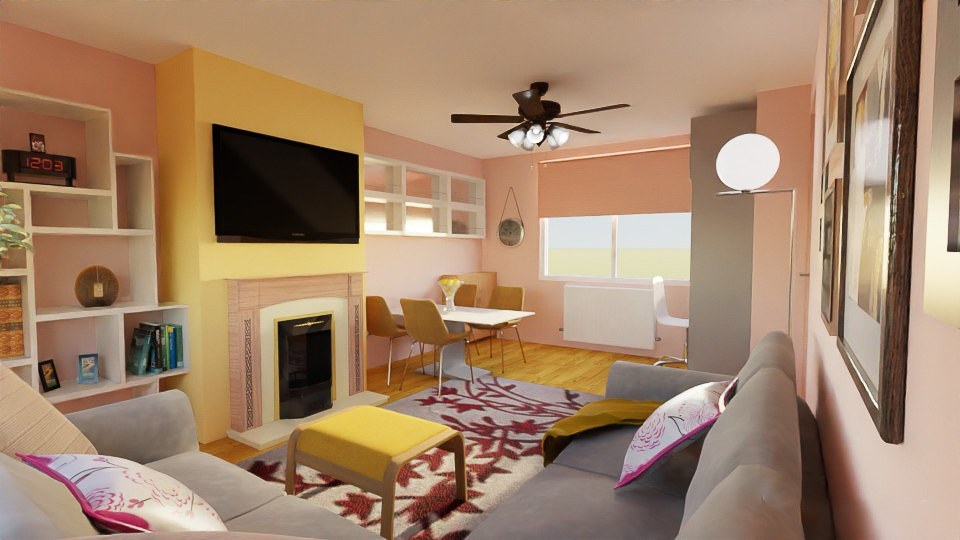
Step 5: The Finishing Touches
Following the moodbaord, I finalised the 3D render to bring the space together visually! To tie everything together, pinks and yellows in cushions were incorporated, complemented by a statement rug. The goal was to maximize space and flow, ensuring a dedicated spot for everyone. With this 3D rendered image, the family can all visualise their lounge and how they will utilise it together.
There is ample space in this room to facilitate a student working at the hideaway desk, whilst hungry children eat at the dinner table. A teenager plays with their virtual headset and parents take a quick breather to relax on the sofa.
Step 6: Embracing Feng Shui
The chosen colours, pink and yellow, hold deep Feng Shui significance – pink symbolizes love and harmony, while yellow represents warmth and positivity. Consider the balance of elemental energies. Incorporate the five elements (Wood, Fire, Earth, Metal, and Water) into your decor and furniture choices to create a harmonious and balanced environment.
While Feng Shui guidelines are essential, don’t forget about personal comfort and functionality. Ultimately, your lounge furniture should be arranged in a way that suits your needs and lifestyle.
Top Tips for Your Calm Transformation:
- Start with a calming colour palette that resonates with your vision.
- Optimize your space with a well-thought-out layout.
- Craft a mood board to visualize your ideas.
- Incorporate Feng Shui principles by selecting colours with intention.
- Pay attention to furniture placement to enhance the room’s flow.
With these steps and top tips, you too can create a serene sanctuary in your living space.
Or, you could get in touch for guidance and help to transform your space using the Ultimate package!
Let the lounge transformation begin! A calm lounge in a. busy home!
Follow for more tips and inspiration at The Balanced Abode on Instagram.